SITE HELP
HELP TOPICS
Icons and what they mean.
![]() -
Clicking on this icon, located at the bottom of the front catalog
page, will take you to the photometric section of the table of
contents for the current fixture type. From the table of contents you may
select the photometric configuration desired.
-
Clicking on this icon, located at the bottom of the front catalog
page, will take you to the photometric section of the table of
contents for the current fixture type. From the table of contents you may
select the photometric configuration desired.![]() - Clicking on this
icon, located at the bottom of the front catalog page, will
open the current document in Adobe Acrobat Reader 3.0 or higher or save
the current cut sheet in a .PDF format, depending on your system
settings.
- Clicking on this
icon, located at the bottom of the front catalog page, will
open the current document in Adobe Acrobat Reader 3.0 or higher or save
the current cut sheet in a .PDF format, depending on your system
settings.![]() - Click this icon, located at the bottom of each photometric
page, to view or download the photometric files in .IES format.
Click here
to see how to download and save the .IES
file.
- Click this icon, located at the bottom of each photometric
page, to view or download the photometric files in .IES format.
Click here
to see how to download and save the .IES
file.![]() - Clicking on this
icon, located at the bottom of the page, will "turn the page"
to the previous topic, take you to the front page or back to the
index.
- Clicking on this
icon, located at the bottom of the page, will "turn the page"
to the previous topic, take you to the front page or back to the
index.![]() - Clicking on this icon, located at the bottom of the
page, will "turn the page" to the next page or take you to the back
page of the current cut sheet.
- Clicking on this icon, located at the bottom of the
page, will "turn the page" to the next page or take you to the back
page of the current cut sheet.
Frequently asked questions.
(A) Your browser has the option for printing the background colors and images turned off.
- On the Tools menu in Internet Explorer, click Internet Options.
- Click the Advanced tab.
- Under Printing , set the Print background colors and images check box.
(Q) I want to print the .PDF file that I have
downloaded.
(A) Open the file
in Adobe Acrobat Reader. If you do not have Adobe Acrobat Reader you will
need to download
a
copy from Adobe (
www.adobe.com
).
(Q) I want to save the .PDF or .IES file and not view
it.
(A) In Internet
Explorer, place the mouse cursor over the appropriate icon and click the
right mouse button then
select
Save Target As...
(Q) I do not understand the Series designators. Is there
another way to find what I
need?
(A) Yes, Use
the
visual index
(found on the navigation
menu) to search for the fixture
visually.
Click
on the thumbnail image of the fixture you want and you are instantly
directed to the
corresponding
catalog sheet.
(Q) When I register Winfotocat and try to download the file I
get a "Forbidden Access" message
and
the file will not
download.
(A) Chances are
you are behind a firewall. Disable your system firewall and try again (or
contact your
system
administrator or technician) or contact
twayman@wlmd.com
and we will send you a copy of the program on a
CD.
(Q) When I go to print a spec-sheet or front page the
page prints on two sheets.
(A) Some of the pages contain more information than will fit on
an 11" long sheet of paper. Try using a
legal
(8-1/2" x 14" ) sheet of paper. Remember to set your printer
up for the 14" sheet.
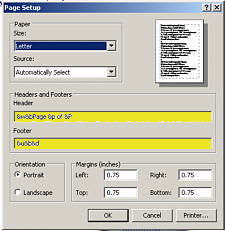
(Q) How can I remove the header and footer information
when the sheet is printed?
(A) To change the options do the
following:
1. On the File menu in Internet Explorer, click
Page Setup you will see below
window.
2. Remove all characters from the Header and
Footer Settings (Shown in
yellow).
3. Click OK then print as usual.

(Q) What is the difference between the "Internet
Catalog" pages and the "Specification
Sheets"?
(A) The Internet Catalog pages are static catalog pages that you
can view and
print.
Specification Sheets are interactive pages that can be modified and
printed. These
sheets
are useful when used in proposals and as customized sheets.
Note: Specification sheets do
not
have a back detail associated with the sheet you will need to go to the
Catalog sheet for a copy
of
the back detail.
If you are having additional problems or find errors on our site please contact Todd Wayman at twayman@wlmd.com .
How to use our Online Specification Sheets.

|
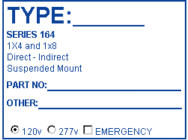
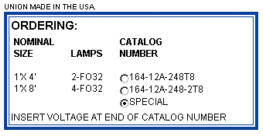
1. Move cursor over to
the input line next to the word "TYPE" and
enter the fixture type for this
specification. 2. In the "ORDERING" box below select the appropriate part number by clicking on the radio button. This part number will appear on the "PART NO" line of the specification box. If you require a special fixture type or the one desired is not listed select "SPECIAL". Once the part number is entered it can be edited. 3. Additional information can be entered on the line next to "OTHER" in the specification box. 4. Select the appropriate voltage by clicking the radio button next to the voltage call out. |

|
5. If the fixture is to
have an emergency ballast check the "EMERGENCY"
check box. 6. To print click the "SEND TO PRINTER" button on top of the view window or use the browser print function. |

For best results view using Microsoft Internet Explorer.
WELLMADE PRODUCTS 1715 KIBBY ROAD - MERCED - CALIFORNIA - 95340 (209) 723-9120 - FAX: (209) 723-9131